How to Configure Backups in Cpanel WHM
It is a prime responsibility of a system administrator to make sure that the backups are enabled on the server. In case of disaster recovery, these backups would be essential to recover the client’s websites and data.
The Backup configuration Manager under WHM, provides an interface for the system administrators to schedule the backups as per requirements. This interface a available under Home >> Backup >> Backup Configuration.
The structure of the interface is quite simplified and broken into sections for easy understanding.
Backup Status
This section provides you a functionality to disable as well as enable the backups on the server. You must click on the radio button ‘enable’ to turn on the backups of your server.
 Backup Type
Under Global Settings, you may choose from either of the backup types as per your backup strategy.
 1. Compressed
Compressed backup stores the user’s data in the compressed format as tar.gz. This procedure requires more time but uses less disk storage. Additionally, this backup process provides more restoration points than other 2 backup processes types. The restoration of users account from the compressed backups takes some time because the process has to first extract the zip files then restore it to the account.
2. Uncompressed
Uncompressed backups are quite faster than the compressed backups but take up more storage space. These backups allow fewer restore points but the restoration of accounts is done quickly because the process doesn’t have to extract the backups from the archives.
3. Incremental
Incremental backups give fewer restore points. The backups are in an uncompressed format and use the disk space approximately to that of the size of the account. The benefit of using incremental backup is that it backs up only the files on which the changes have been made and are synced each time the backup runs.
Minimum Free Disk Space Check

You do not want to run into a situation where the backup would fill up the disk space because this will cause the system to crash along with services running on the server. If you enable this option by clicking the checkbox then it will make sure that it calculates the disk before it performs the backup. The system will halt the backups if the disk space is less than the amount of space required for the backups.
Maximum destination timeout in seconds

If you have a large number of accounts to backup then make sure you have entered a large number of seconds to backup the data otherwise it will timeout and stop the process.
Maximum restore timeout
Similarly, enter a large number of seconds to restore the accounts otherwise it will timeout and stop the process.
Scheduling and Retention
The interface provides you to schedule the Backups based on Daily, Weekly, Monthly basis. On a safer side, it is essential to keep more than one copy of the backup so you may use a combination of Daily, Weekly, Monthly settings.
The weekly backup provides a flexibility to back up the data by providing a checkbox to select from either or all days of the week.
Retention
You must focus on the number of backup copies you want to retain on the server. We must understand the retention behaviour when the backup is successful the oldest backup is automatically deleted from the server. Whereas, if the backup is partially completed then it will not be deleted and continue to retain the oldest backup on the server.
You will notice a checkbox for ‘’Strictly enforce retention regardless of backup success’’. If this feature is enabled then in spite of the backup success or not, it will store a copy of the backup based on the retention value otherwise the system keeps copies of the older backups on the server even if the backups are failed, filling up the disk space.
Monthly Backup gives a flexibility to backup the data on 1st and 15th of every month.
Files
Backup Accounts
You must tick the checkbox Backup Accounts and selects individual users from the list of cPanel accounts that you would like to backup.
To do so, click on the tab Select users and it will redirect you to Home »Backup »Backup User Selection that represents column for Domain name and it’s associated username along with toggle button to enable under backups column. Using this toggle button you may switch on/off backups for a particular user account.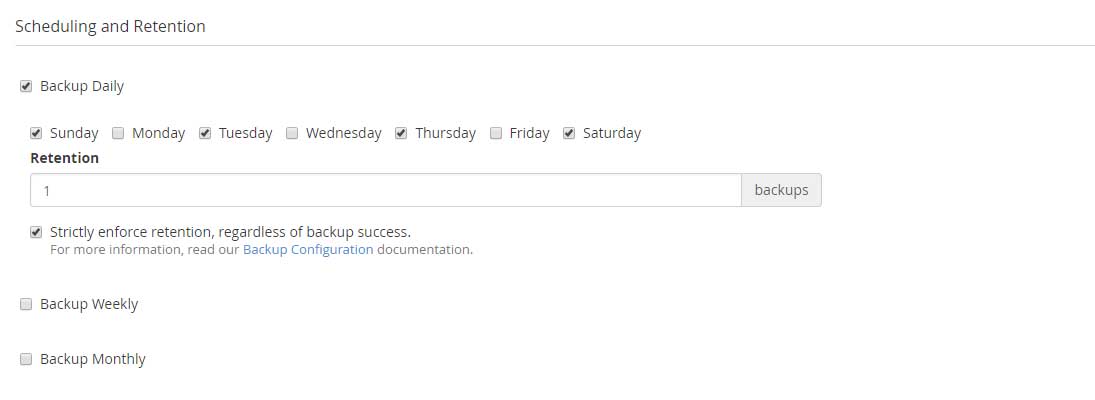
It’s your choice to backup suspended accounts, Access Logs, Bandwidth Data, Use Local DNS (to backup DNS)

Backup System Files
System files backup is important during server restoration.
Databases
 Under database section, you must select the option to backup the databases as per the accounts or entire MySQL directory or both. The database backups are essential to recover the databases from the crash and during MySQL recovery.
Configure Backup Directory
 It is important to specify the location of the backup directory where the backups would be stored on the local server.
Retain backups in the default backup directory.
This option retains the backups in the default local backup directory location even after the backups are transported to the remote location. The backups will be deleted if this option is not enabled. This option is important when you have configured FTP server to store the accounts (example Amazon server)
Mount Backup Drive as Needed
This option should be kept disabled unless a mount point exists. The backup configuration process checks for a mount point entry under /etc/fstab. The drive is unmounted when the backup process completes.
Additional Destinations
If you have an external storage to store the backups and no longer want the backups to occupy a space on the local server then you can configure the backups under Additional Destinations.
There are 8 different types of destination type available in the drop-down list.
-
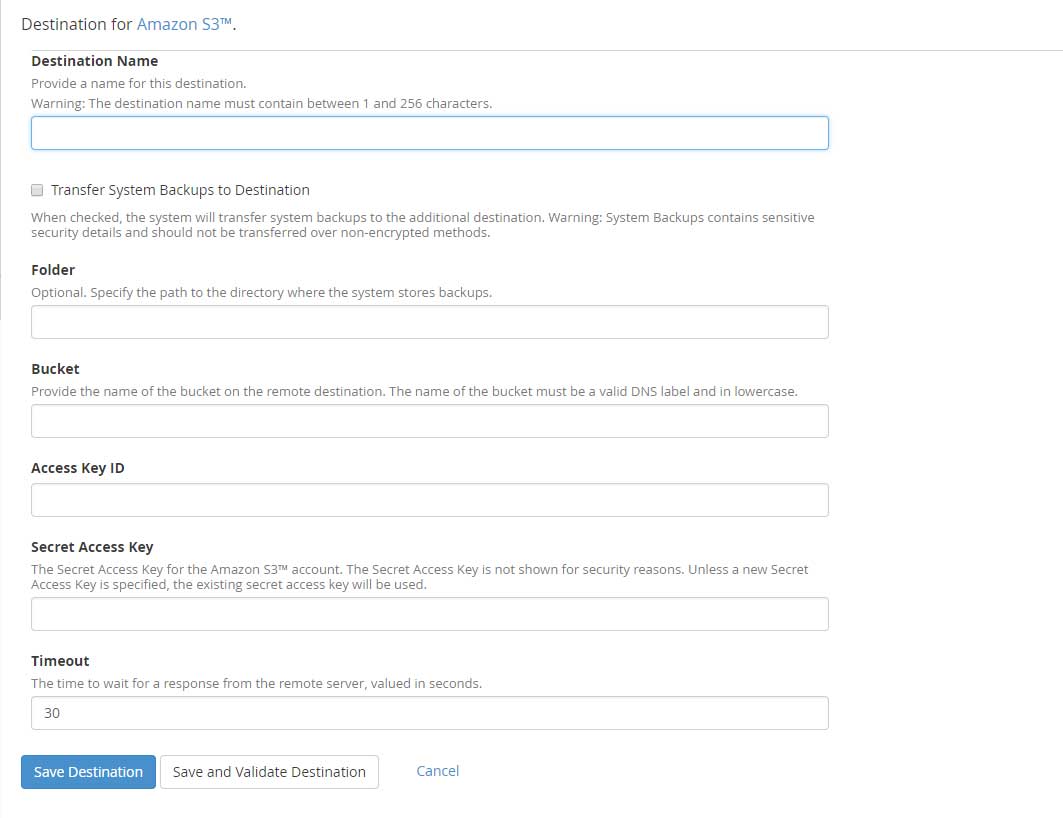
 The destination for Amazon S3™.
Amazon S3 is very popular storage destination provided by Amazon cloud services. It has very robust and reliable storage systems in the market. Use of Amazon S3 storage is having great advantages with scalability and safety of your backups.
-
Destination Name: Enter the Destination name containing characters between 1 to 255.
-
Folder: This is optional. You can specify the path at the remote location where you would like to store the backups (something meaningful for example: Server IP address)
-
Bucket: The name of the bucket with valid DNS label and in lowercase available on the remote location.
-
Access Key ID: Enter the Access Key ID provided by Amazon.
-
Secret Access Key: Enter the Secret Access Key provided for the Amazon S3 account.
-
Timeout: The maximum time in seconds to wait for a response from the remote server. The digits must be between 30 to 300.
Click on Save and Validate destination tab in order to check that the connection is successfully established to the remote Amazon s3 server with the credentials entered above.
-
FTP
FTP as the name suggests you can transfer the backup files on remote FTP host. Well, this is not a very popular option when it comes for taking backups of your cpanel server for multiple accounts in hundreds, The system performance will be poor over the time and will take a lot of server resources & bandwidth. Still, If you have remote host space you can use this option for 1 or 2 accounts.
-
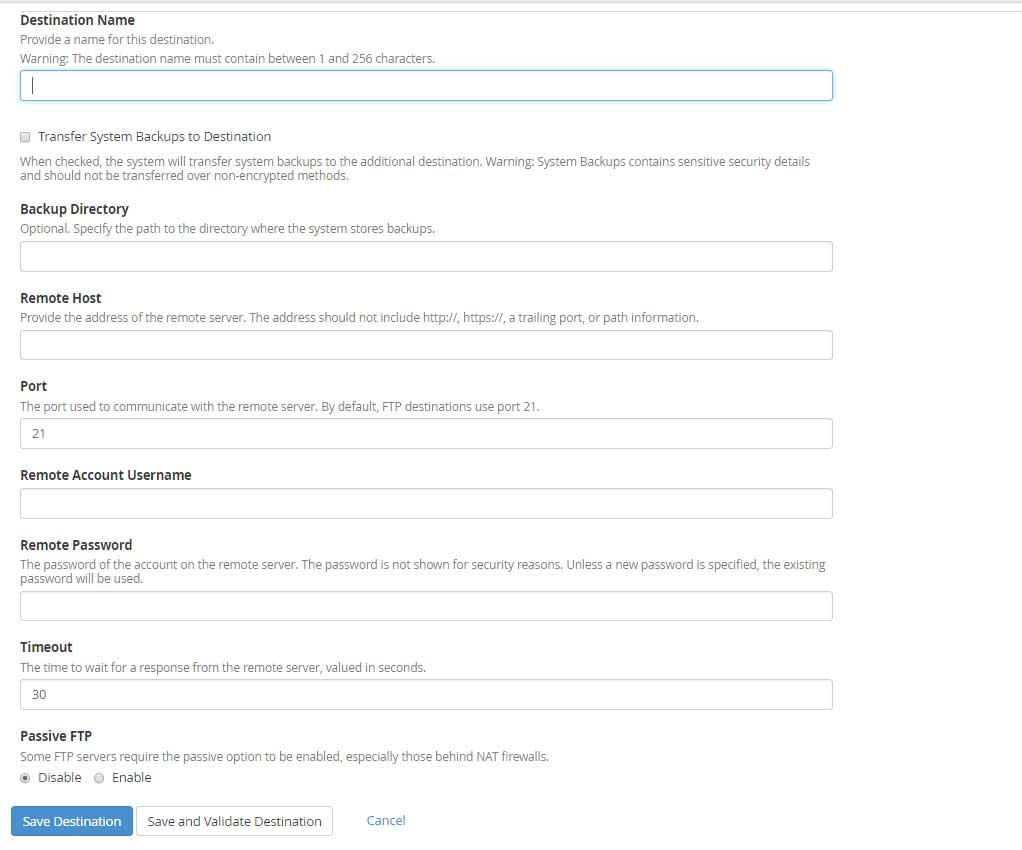 Destination Name: Enter a meaningful name for the Destination.
 -
Transfer System Backups to Destination: Select the checkbox to transfer the data to a remote location.
-
Backup Directory: Enter the location of the backup directory where you would like to store the backups.
-
Remote Host: Enter the IP address of the remote server.
-
Port: By default, the port is 21.
-
Remote Account Username: Enter FTP username
-
Remote Password: Enter FTP remote users password
-
Timeout: The maximum time in seconds to wait for a response from the remote server. The digits must be between 30 to 300.
-
Passive FTP: Some FTP servers require this option to be enabled especially those behind Natting.
Click on Save and Validate destination tab in order to check that the connection is successfully established to the remote FTP server with the credentials entered above.
-
Google Drive
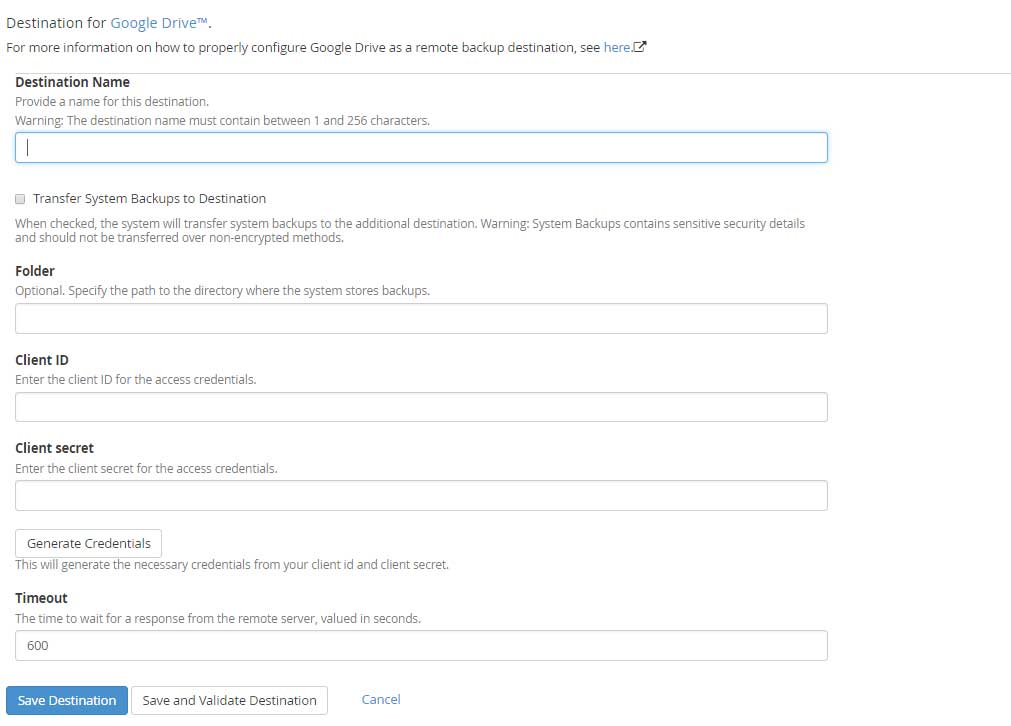
‘Here is an advantage of using google drive, You can use your free 15GB Google Drive space for your cPanel server backup. Let’s see how to configure the google drive with cpanel.
-
Destination Name: Enter the Destination name containing characters between 1 to 255.
-
Transfer System Backups to Destination: select the checkbox to transfer the data to a remote location.
-
Folder: This is optional. You can specify the path at the remote location where you would like to store the backups (something meaningful for example : Server IP address)
-
Client ID: Enter the client ID for the access credentials.
-
Client secret: Enter the client secret for the access credentials.
-
Timeout: The maximum time in seconds to wait for response from the remote server. The digits must be between 30 to 300.
Click on Save and Validate destination tab in order to check that the connection is successfully established to the remote Google Drive server with the credentials entered above.
-
Additional Local Directory
Local Destination means transferring the backups to a particular folder or different partition within the server itself. You can specify a different backup directory where would like to transfer the backups. This option is helpful if you want to keep copies of your backups on the same server but under a specific location.
-
Destination Name: Enter the Destination name containing characters between 1 to 255.
-
Transfer System Backups to Destination: select the checkbox to transfer the data to a remote location.
-
Backup Directory: If the backup configuration is enabled then the process checks for a mount point entry under /etc/fstab . The drive is unmounted when the backup process completes.
Click on Save and Validate destination tab in order to check that the connection is successfully established to the remote server with the credentials entered above.
-
Rsync
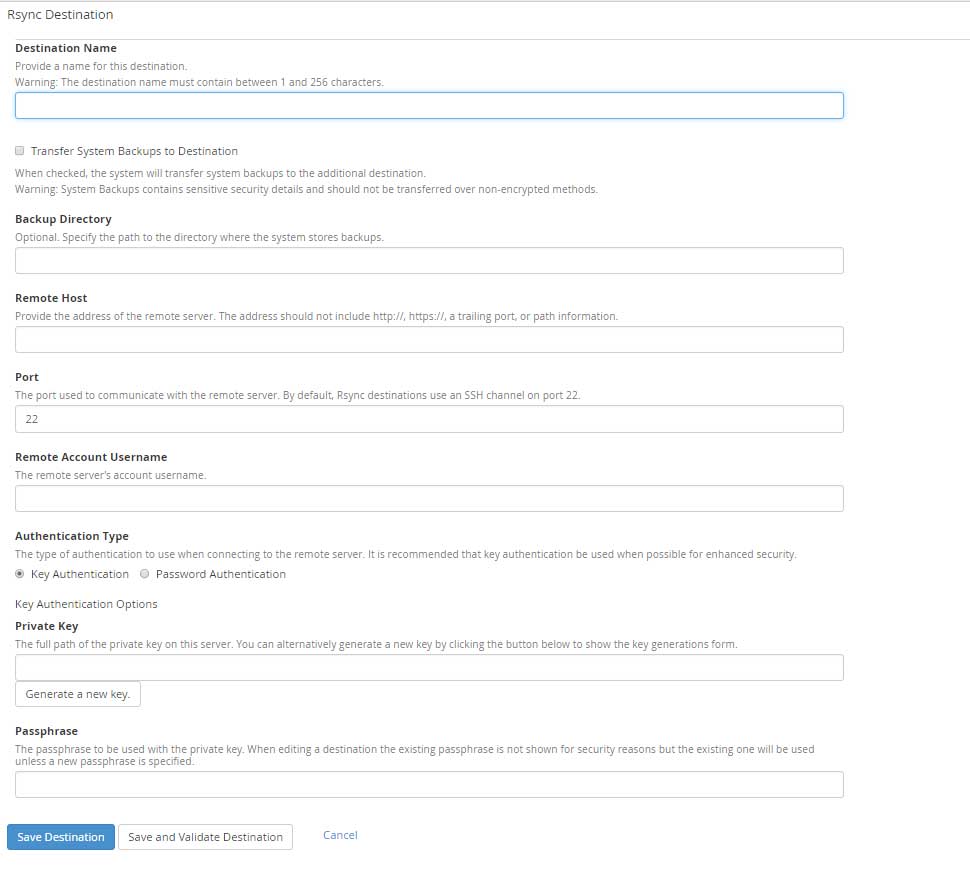
Normally called as remote sync. Using rsync is the best-recommended option over FTP and SFTP as it provides the option to compress the data as it’s being copied over. The transfer of backups to the remote host is very fast and take less time and fewer server resources. I will recommend using rsync over FTP and SFTP anytime.
-
Destination Name: Enter the Destination name containing characters between 1 to 255.
-
Backup Directory: Enter the location of the backup directory where you would like to store the backups.
-
Remote Host: Hostname or IP address of the remote server.
-
Port: By default, it’s 22 but you must replace this with the port number used to communicate with the remote server.
-
Remote Account Username: The remote server’s account username to connect.
-
Authentication Type: There are 2 available options to choose from, Key Authentication and Password Authentication. You must enter Private Key if you choose Key Authentication for connection.
-
Passphrase: For security reasons, you must enter passphrase associated with a Private key.
Click on Save and Validate destination tab in order to check that the connection is successfully established to the remote server with the credentials entered above.
-
-
SFTP
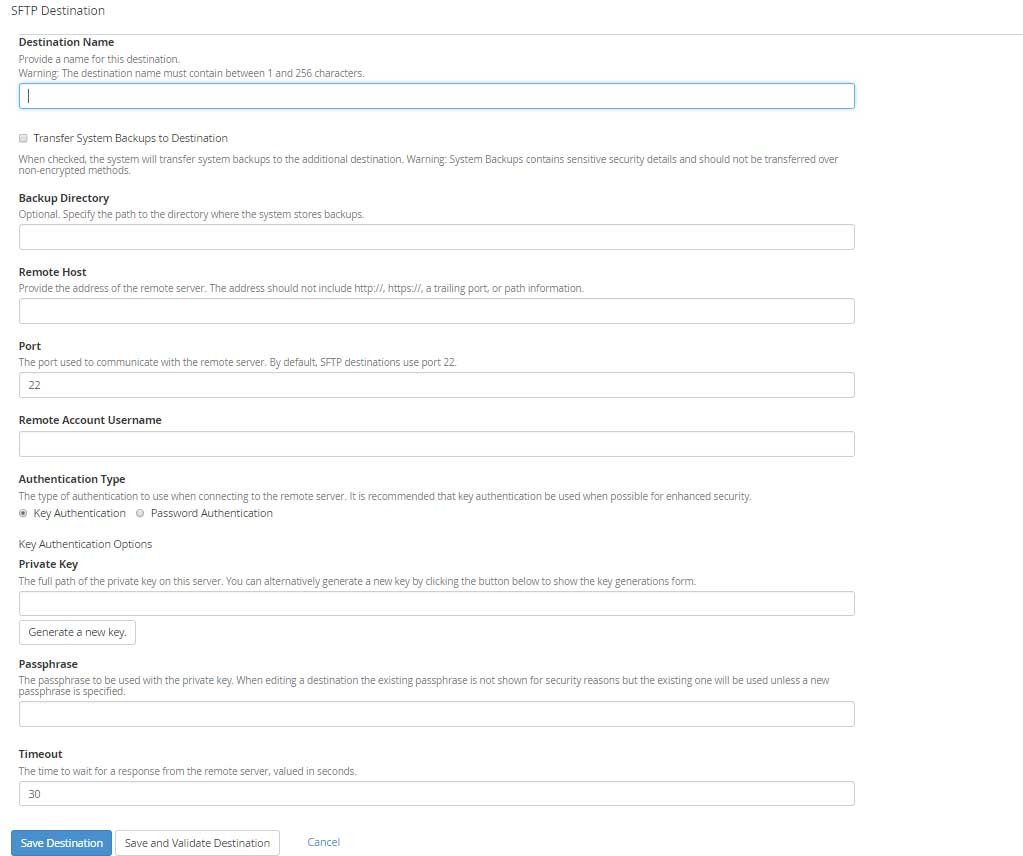
SFTP is very similar to FTP but this method transfers the backup is secure way over port 22, which is normally called the shell access port.
-
-
Destination Name: Enter the Destination name containing characters between 1 to 255.
-
Backup Directory: Enter the location of the backup directory where you would like to store the backups.
-
Remote Host: remote servers hostname or IP address.
-
Port: by default, it’s 22.
-
Remote Account Username: Enter SFTP username
-
Authentication Type: There are 2 available options to choose from, Key Authentication and Password Authentication. You must enter Private Key if you choose Key Authentication for connection.
-
Passphrase: For security reasons, you must enter passphrase associated with the Private key.
-
Timeout: The maximum time in seconds to wait for a response from the remote server. The digits must be between 30 to 300.
Click on Save and Validate destination tab in order to check that the connection is successfully established to the remote SFTP server with the credentials entered above.
-
-
WebDAV
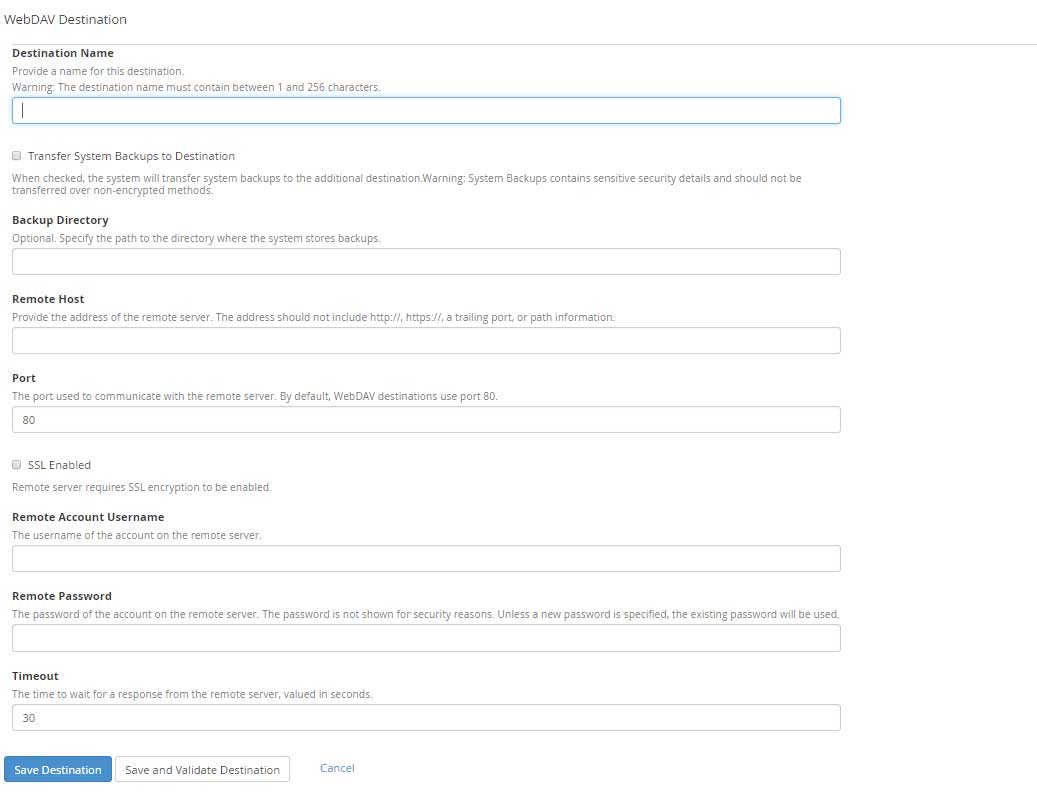
WebDAV is an extension for HTTP and makes the web a readable and writable medium so you can manage your files across World Wide Web.
-
-
Destination Name: Enter the Destination name containing characters between 1 to 255.
-
Transfer System Backups to Destination: select the checkbox to transfer the data to a remote location.
-
Backup Directory: Enter the location of the backup directory where you would like to store the backups.
-
Remote Host: Remote servers hostname or IP address.
-
Port: By default for WebDAV it is 80
-
SSL Enabled: Tick the checkbox to enable SSL. WebDAV destinations require that you enable SSL encryption.
-
Remote Account Username: Enter username of the remote user to connect.
-
Remote Password: The password for Remote Account Username.
-
Timeout: The maximum time in seconds to wait for a response from the remote server. The digits must be between 30 to 300.
Click on Save and Validate destination tab in order to check that the connection is successfully established to the remote WebDAV server with the credentials entered above.
-
Custom Destination
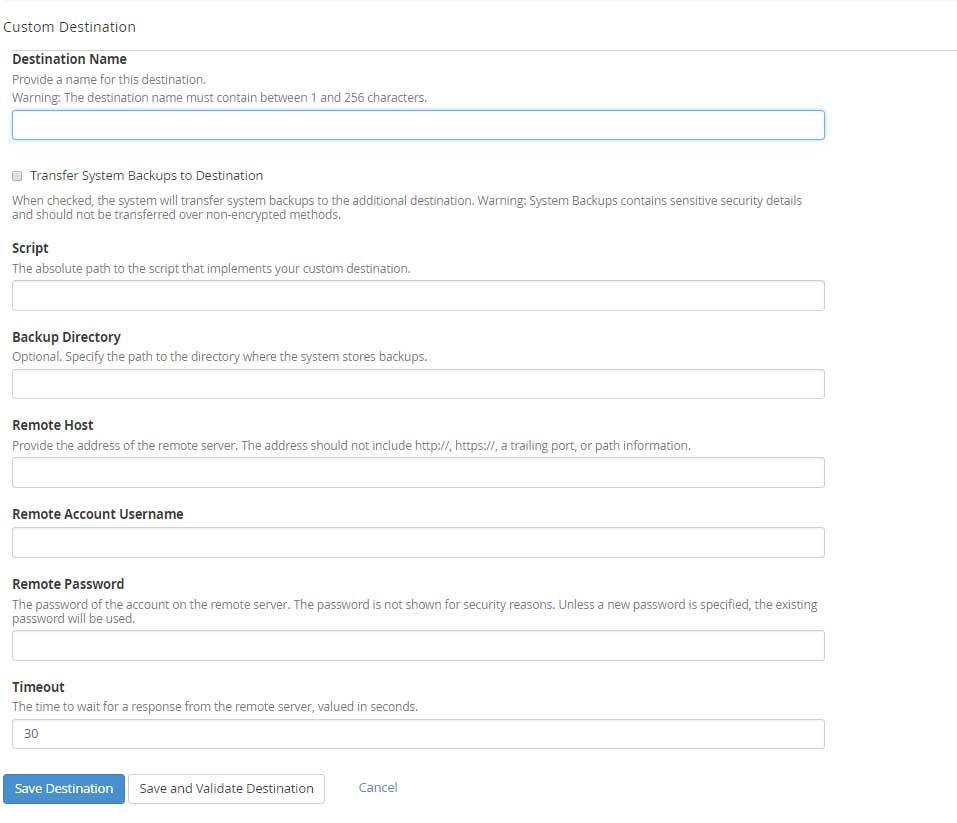
Using Custom Destination you can create a script which includes the information in the order Command name, Current directory, Command specific parameters, Host, and Username. By default, the script is told to use the remote location directory for performing the backup operation. Under Custom destination you will notice a text box to enter the remote Password, this password is passed through the script via PASSWORD environment variable and it will not be displayed on the command line.
-
Destination Name: Enter the Destination name containing characters between 1 to 255.
-
Transfer System Backups to Destination: Select the checkbox to transfer the data to a remote location.
-
Script: Enter the absolute path of the custom script.
-
Backup Directory: Enter the location of the backup directory where you would like to store the backups.
-
Remote Host >> Remote servers hostname or IP address.
-
Remote Account Username: Enter username of the remote user to connect.
-
Remote Password: The password for Remote Account Username.
-
Timeout: The maximum time in seconds to wait for a response from the remote server. The digits must be between 30 to 300.
Click on Save and Validate destination tab in order to check that the connection is successfully established to the remote server with the credentials entered above.


