CloudLinux management on cPanel server
Installation
You can download latest CloudLinux ISO and use it to install CloudLinux on your server:
Latest stable CloudLinux 6.4 ISO:
x86_64 version: Please search ISO on Google
i386 version: Please search Latest ISO on Google
If you want to convert your existing server to CloudLinux you need to get CloudLinux activation key from. Get <activation_key> either by getting trial subscription or by purchasing subscription. You can download CloudLinux Converting scripts here and convet your server through folllowing command
wget http://repo.cloudlinux.com/cloudlinux/sources/cln/cldeploy
 sh cldeploy -k <activation_key> # if you have activation key
 or
 sh cldeploy -i # if you have IP based license
 reboot
Once it’s successfully done, Reboot your server so that it will be boot on CloudLinux kernel with LVE enabled.
Checking LVE installation :
Check your kernel version with the following command :
uname -r
You should see something like 2.6.18-294.8.1.el5.lve0.8.60. The kernel should have lve in its name.
To see if lve kernel module is loaded do
lsmod|grep lve

 lve 46496 0
To see if iolimits module is enabled (el6.lve1.1.9 kernels and later):
lsmod|grep iolimits

 iolimits
Enabled/Disable LVE :
/etc/sysconfig/lve and setting LVE_ENABLE variable to yes or no.
Setting it to yes will enable LVE, setting it to no will disable LVE.
Checking LVE Usage :
One of the best way to monitor current usage is lvetop
lvetop

 ID EP PNO TNO CPU MEM I/O

 test 1 2 2 2% 728 0
You can also check the content of /proc/lve/list file that has all the data about LVE usage for all LVEs
cat /proc/lve/list

 4:LVE EP lCPU lIO CPU MEM IO lMEM lEP nCPU fMEM fEP

 0 0 75 25 0 0 0 262144 20 2 0 0

 500 0 75 25 0 0 0 4294967 20 3 2 1

 700 1 75 25 1403247 202 0 262144 20 2 0 0
LVE Manager
LVE Manager is a plugin for most pop control panels including cPanel, Plesk, DirectAdmin and ISPmanager (InterWorx coming soon). It allows you to control and monitor limits, and set limits on per package bases.
LVE Manager is installed by default on most servers. If it is missing you can always install it by running:
yum install lvemanager
cPanel LVE Manager
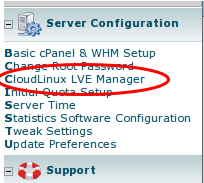
LVE Manager can be accessed through WHM interface. It is located under Server Configuration -> CloudLinux LVE Manager
LVE Manger provides an easy way to monitor current, real time usage
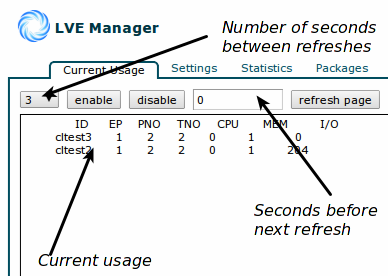
Adjust settings for individual accounts
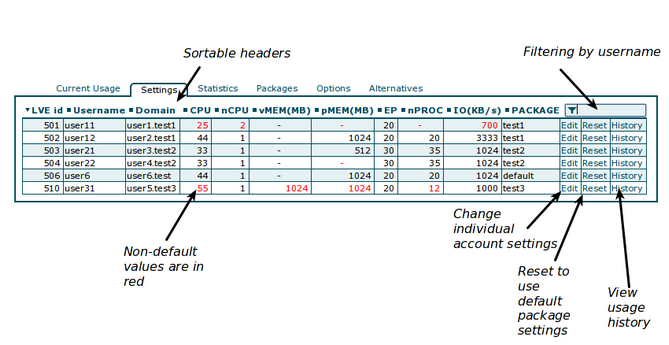
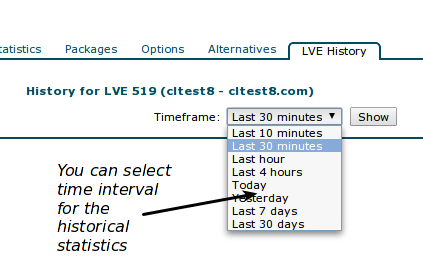
View individual account usage history
CageFS Installations
Requirements
kernel: CL5 with lve0.8.54 or later, CL6 with lve1.2.17.1 or later
7GB of disk space
yum install cagefs

 /usr/sbin/cagefsctl --init
That last command will create skeleton directory that might be around 7GB in size. If you don’t have enough disk space in /usr/share, use following commands to have cagefs-skeleton being placed in a different location:
mkdir /home/cagefs-skeleton

ln -s /home/cagefs-skeleton /usr/share/cagefs-skeleton
Managing user with cagefs
CageFS provides for two modes of operations:
- Enabled for all, except those that are disabled
- Disabled for all, except those that are enabled
Mode #1 is convenient for production operation, where you want all new users to automatically be added to CageFS.
Mode #2 is convenient while you test CageFS, as it allows you to enable it on one by one for your customers.
To start using CageFS you have to select one of the mode of operations.
/usr/sbin/cagefsctl --enable-all
OR
/usr/sbin/cagefsctl --disable-all
OR
/usr/sbin/cagefsctl --toggle-mode
That will switch the operation mode, preserving current disabled/enabled users
To enable individual user do:
$ /usr/sbin/cagefsctl --enable [username]
To disable individual user:
$ /usr/sbin/cagefsctl --disable [username]
To list all enabled users:
$ /usr/sbin/cagefsctl --list-enabled
To list all disabled users
$ /usr/sbin/cagefsctl --list-disabled
To see current mode of operation:
$ /usr/sbin/cagefsctl --display-user-mode
Some cagefs Command :
Usage: /usr/sbin/cagefsctl [OPTIONS]

Options:

-i | --init : initialize CageFS (create CageFS if it does not exist)

-r | --reinit : reinitialize CageFS (make backup and recreate CageFS)

-u | --update : update files in CageFS (add new and modified files to CageFS, remove unneeded files)

--update-etc : update /etc template only

-f | --force  : recreate CageFS (do not make backup, overwrite existing files)

-d | --dont-clean : do not delete any files from skeleton (use with --update option)

-k | --hardlink : use hardlinks if possible

--create-mp : Creates /etc/cagefs/cagefs.mp file

--mount-skel : mount CageFS skeleton directory and start cagefs-fuse service (if not started)

--unmount-skel: unmount CageFS skeleton directory and stop cagefs-fuse service (if started)

--remove-all : disable CageFS, remove templates and /var/cagefs directory

--addrpm  : add rpm-packages in CageFS (run "cagefsctl --update" in order to apply changes)

--delrpm : remove rpm-packages from CageFS (run "cagefsctl --update" in order to apply changes)

--list-rpm : list rpm-packages that are installed in CageFS

-e | --enter  : enter into user's CageFS as root

 --enable-cagefs : enable CageFS

--disable-cagefs : disable CageFS

--set-min-uid : Set min UID

--get-min-uid : Display current MIN_UID setting

--do-not-ask : assume "yes" in all queries (should be the first option in command)

--set-update-period: set minimum period for doing update of a skeleton (default 1 day)

--force-update : forces the update even if min period is yet to be reached.

--tmpwatch : forces clean up of all user's tmp directories

--set-tmpwatch : set command to run to clean up end user tmp directories, like: --set-tmpwatch='/ /sbin/tmpwatch -umclq 720'

-m | --remount  : remount specified user(s)

-M | --remount-all : restart cagefs-fuse service, remount CageFS skeleton directory and all users

(use this each time you have changed cagefs.mp file)

-w | --unmount  : unmount specified user(s)

-W | --unmount-all  : stop cagefs-fuse service, unmount CageFS skeleton directory and all users

--create-virt-mp USERNAME : creates virt.mp file for Plesk user

--create-virt-mp-all : creates virt.mp file for all Plesk users

-l | --list  : list users that entered in CageFS

--enable  : enable CageFS for the user

--disable  : disable CageFS for the user

--enable-all  : enable all users, except specified in /etc/cagefs/users.disabled

 --disable-all  : disable all users, except specified in /etc/cagefs/users.enabled

 --display-user-mode : display current mode ("Enable All" or "Disable All")

 --toggle-mode  : toggle mode saving current lists of users

(lists of enabled and disabled users remain unchanged)

 --list-enabled  : list enabled users

 --list-disabled : list disabled users

 --getprefix  : display prefix for user
PHP Selector
Installtion :
The installation of PHP Selector presumes that you already have CageFS & LVE Manager installed.
Installation of different versions of PHP & modules :
yum groupinstall alt-php
Update CageFS & LVE Manager with support for PHP Alternatives
yum update cagefs lvemanager
cPanel/WHM: Make sure ‘Select PHP version’ is enabled in Feature Manager
alternative php5.2 versions should load /opt/alt/php52/etc/php.ini file and scan /opt/alt/php52/etc/php.d directory for modules:
Configuration File (php.ini) Path /opt/alt/php52/etc

 Loaded Configuration File /opt/alt/php52/etc/php.ini

 Scan this dir for additional .ini files /opt/alt/php52/etc/php.d

 additional .ini files parsed /opt/alt/php52/etc/php.d/alt_php.ini
Those are default locations for alt-php.
If you need custom PHP settings per user, please change them via “Edit PHP settings” feature of PHP Selector.
Using PHP Selector
Once PHP Selector is installed you will see “Selector” tab in LVE Manager

PHP Selector lets you select default PHP version, as well as modules that will be available to user out of the box.
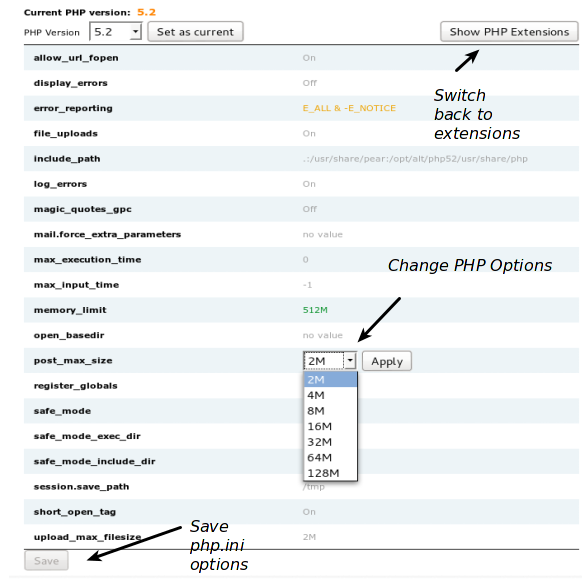
Inside cPanel, User will be able to change PHP version they would have
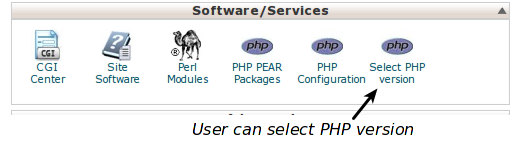
as well as extensions that they want to use:
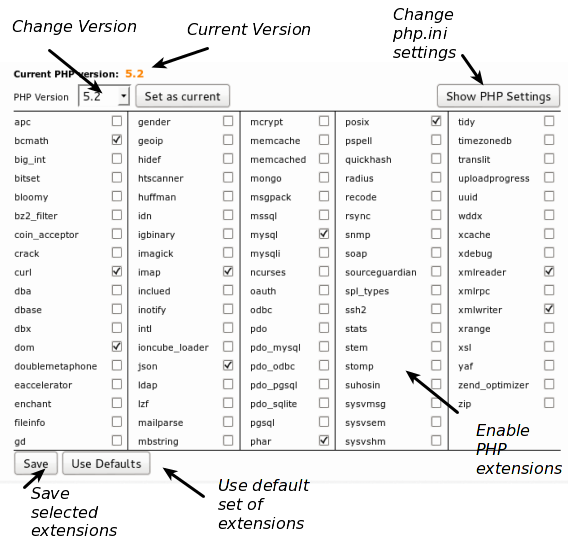
and php.ini settings